
Learning how to inject Tirzepatide (Mounjaro) — step‑by‑step can feel overwhelming at first, but with proper guidance and technique, this once-weekly injection becomes a straightforward part of your diabetes or weight management protocol. Whether you’re a healthcare professional administering research-grade peptides or seeking comprehensive knowledge about proper subcutaneous injection methods, mastering the correct technique ensures optimal absorption, minimises discomfort, and reduces the risk of complications.
Tirzepatide, marketed as Mounjaro, represents a breakthrough dual glucose-dependent insulinotropic polypeptide (GIP) and glucagon-like peptide-1 (GLP-1) receptor agonist. This innovative peptide therapy requires precise administration to achieve its full therapeutic potential. Understanding the nuances of injection site selection, pen operation, dosing schedules, and safety protocols separates successful outcomes from suboptimal results.
This comprehensive guide walks through every aspect of how to inject Tirzepatide (Mounjaro) — step‑by‑step, from preparing your injection supplies to post-administration care. By following evidence-based protocols and manufacturer guidelines, you’ll develop confidence in proper technique whilst avoiding common pitfalls that compromise treatment efficacy.
Key Takeaways
- ✅ Proper injection technique requires holding the pen or syringe in place for at least 10 seconds to ensure complete dose delivery
- 💉 Three approved injection sites include the abdomen (2+ inches from navel), outer thigh, and back of upper arm (when assisted)
- 🔄 Site rotation is essential with each weekly dose to prevent lipodystrophy and maintain optimal absorption
- 📊 Starting dosage protocol begins at 2.5 mg weekly for 4 weeks before increasing to 5 mg to minimise gastrointestinal effects
- ⏰ Flexible timing allows administration at any time of day, with or without meals, maintaining the same day each week
Understanding Tirzepatide (Mounjaro) and Its Administration Requirements
Tirzepatide functions as a dual-action peptide that activates both GIP and GLP-1 receptors, creating a synergistic effect on glucose regulation and appetite control. This pharmaceutical compound requires subcutaneous administration—injection into the fatty tissue layer beneath the skin—for proper absorption into the bloodstream[1].
The subcutaneous route ensures gradual, sustained release of the peptide, maintaining therapeutic blood levels throughout the week. Unlike intramuscular injections that penetrate deeper muscle tissue, subcutaneous injections target the adipose layer, which contains fewer nerve endings and blood vessels, resulting in reduced discomfort and more predictable pharmacokinetics.
Why Injection Technique Matters
Proper injection technique directly impacts:
- Bioavailability: Correct depth and site selection ensure optimal absorption rates
- Comfort: Proper angle and speed minimise pain and bruising
- Efficacy: Complete dose delivery guarantees therapeutic blood levels
- Safety: Avoiding damaged skin prevents infection and local reactions
- Consistency: Standardised technique produces reproducible results
Research-grade peptides like those available from PEPTIDE PRO require the same meticulous attention to administration protocols as pharmaceutical preparations. Whether working with tirzepatide or other research peptides in laboratory settings, understanding fundamental injection principles ensures data integrity and experimental validity.
Dosing Schedule Overview
| Week | Standard Dose | Purpose |
|---|---|---|
| 1-4 | 2.5 mg | Initial tolerance building |
| 5-8 | 5 mg | First therapeutic increase |
| 9+ | 7.5-15 mg | Gradual titration as needed |
The conservative starting dose of 2.5 mg weekly allows the body to adapt to tirzepatide’s effects on gastric emptying and appetite regulation, significantly reducing the incidence of nausea, vomiting, and diarrhoea[2]. After four weeks, the dose escalates to 5 mg, with subsequent increases in 2.5 mg increments every four weeks based on glycaemic response and tolerability.
Maximum recommended dosage reaches 15 mg weekly, though many individuals achieve therapeutic goals at lower doses. This gradual titration approach balances efficacy with tolerability, a principle that applies across peptide research protocols.
Preparing for Your Tirzepatide Injection
Thorough preparation establishes the foundation for safe, effective administration. Before learning how to inject Tirzepatide (Mounjaro) — step‑by‑step, gathering supplies and creating an appropriate environment prevents complications and ensures smooth execution.
Essential Supplies Checklist
For pre-filled pen devices:
- ✔️ Mounjaro pen (correct dosage)
- ✔️ Alcohol swabs (70% isopropyl alcohol)
- ✔️ Sharps disposal container
- ✔️ Clean, flat surface
- ✔️ Cotton ball or gauze (optional)
- ✔️ Adhesive bandage (optional)
For vial administration:
- ✔️ Tirzepatide vial (correct concentration)
- ✔️ Insulin syringe with needle (typically 0.5 mL capacity)
- ✔️ Alcohol swabs
- ✔️ Sharps disposal container
- ✔️ Bacteriostatic water (if reconstitution required)
Pre-Injection Preparation Protocol
1. Temperature Equilibration
🌡
️ Remove the tirzepatide pen or vial from refrigeration 30-60 minutes before injection. Room temperature medication reduces injection discomfort and prevents crystallisation that can occur with cold solutions. Never use external heat sources like microwaves or hot water—allow natural warming only.
2. Visual Inspection
👁
️ Examine the solution carefully. Tirzepatide should appear clear and colourless to slightly yellow. Reject any medication containing:
- Particulate matter or floating debris
- Cloudiness or haziness
- Discolouration (dark yellow, brown, or other colours)
- Crystallisation or precipitation
3. Expiration Verification 📅
Check the expiration date printed on the pen or vial. Never use expired medication, as potency degrades over time, potentially compromising therapeutic outcomes.
4. Hand Hygiene 🧼
Wash hands thoroughly with soap and warm water for at least 20 seconds. Proper hand hygiene represents the single most effective infection prevention measure. If soap and water aren’t available, use alcohol-based hand sanitiser containing at least 60% alcohol.
5. Workspace Organisation
Arrange all supplies on a clean, well-lit surface. Good lighting helps identify injection landmarks and ensures proper technique visualisation. A clutter-free workspace minimises contamination risk and reduces stress during administration.
“Preparation prevents poor performance. Taking time to properly set up your injection workspace significantly reduces errors and improves overall injection experience.” — Clinical Administration Guidelines
For researchers working with peptides from suppliers like PEPTIDE PRO, these preparation principles apply universally across different peptide compounds, ensuring consistent laboratory protocols and reliable experimental outcomes.
Selecting and Preparing the Injection Site
Proper injection site selection and preparation critically influence absorption, comfort, and safety. Understanding anatomical considerations and rotation strategies optimises tirzepatide administration outcomes.
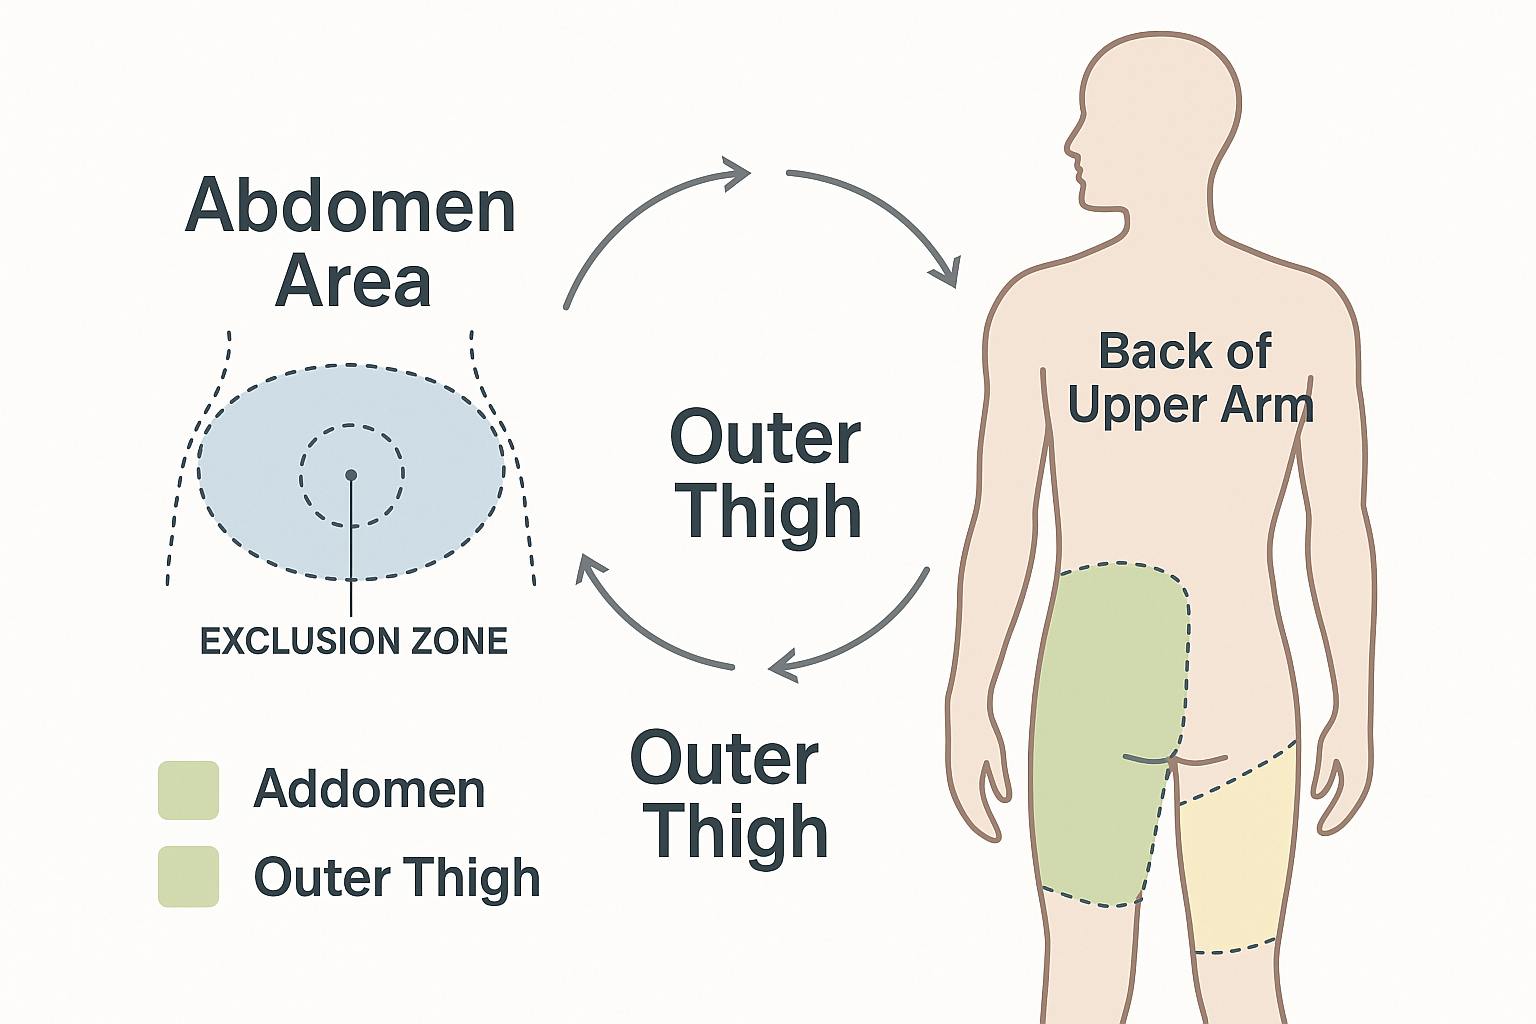
Approved Injection Sites for Tirzepatide
Abdomen (Preferred Site)
�
� The abdominal area offers the largest injection surface and typically provides the most consistent absorption. Key guidelines include:
- Location: Anywhere on the abdomen except within 2 inches (5 cm) of the navel
- Boundaries: Between the lower ribs and pelvic bone, extending to the sides
- Advantages: Easy self-administration access, substantial subcutaneous tissue, consistent absorption
- Considerations: Avoid the midline directly over abdominal muscles; target areas with adequate fatty tissue
Outer Thigh 🦵
The anterolateral thigh provides an accessible alternative site with good subcutaneous tissue depth:
- Location: Front and outer portion of the thigh, midway between hip and knee
- Boundaries: Avoid the inner thigh (more sensitive, proximity to major vessels)
- Advantages: Easy self-administration, good for individuals with limited abdominal adipose tissue
- Considerations: May be slightly more uncomfortable than abdomen; ensure adequate tissue pinch
Back of Upper Arm 💪
The posterior triceps area serves as a third option, though typically requires assistance:
- Location: Back of the upper arm, midway between shoulder and elbow
- Boundaries: Posterior and lateral aspects only; avoid the inner arm
- Advantages: Alternative when other sites are unsuitable
- Considerations: Difficult to self-administer; typically requires another person; less subcutaneous tissue in lean individuals
Site Rotation Strategy
Why rotation matters: Repeatedly injecting the same spot causes lipodystrophy—abnormal fat distribution that creates lumps (lipohypertrophy) or depressions (lipoatrophy) in the skin. These changes impair insulin and peptide absorption, reducing therapeutic efficacy[3].
Effective rotation protocol:
- Divide each area into quadrants: For example, divide the abdomen into upper right, upper left, lower right, and lower left sections
- Maintain spacing: Keep injections at least 1 inch (2.5 cm) apart from previous injection sites
- Systematic progression: Follow a consistent pattern (clockwise rotation, alternating sides, etc.)
- Documentation: Keep a simple log or use a rotation chart to track injection locations
- Weekly cycle: With once-weekly dosing, you can use the same general area (e.g., abdomen) but different specific spots within that region
Site Preparation Technique
Step 1: Site Selection
Choose an injection site following your rotation schedule. Visually inspect the skin for:
- ❌ Cuts, scrapes, or open wounds
- ❌ Bruises or discolouration
- ❌ Rashes, redness, or irritation
- ❌ Scars or tattoos
- ❌ Moles or skin lesions
- ❌ Previous injection sites showing lumps or depressions
Step 2: Cleansing
Using a fresh alcohol swab, cleanse the injection site with firm, circular motions, working outward from the centre. This technique pushes bacteria away from the injection point rather than concentrating them at the puncture site.
Step 3: Drying
Allow the alcohol to air-dry completely (30-60 seconds). Never blow on the site or fan it with your hand, as this reintroduces bacteria. Injecting through wet alcohol causes stinging and may carry surface bacteria into the tissue.
Step 4: Final Assessment
Ensure the prepared site remains untouched until injection. If you accidentally touch the cleansed area, repeat the cleansing process.
How to Inject Tirzepatide (Mounjaro) — Step‑by‑Step Using the Pre-Filled Pen
The Mounjaro pre-filled pen device simplifies administration through an intuitive design that delivers precise doses with minimal user intervention. This section provides detailed step‑by‑step instructions for how to inject Tirzepatide (Mounjaro) using the single-dose pen.
Understanding the Mounjaro Pen Components
Before injection, familiarise yourself with the pen anatomy:
- Base cap (grey): Protective cover over the needle
- Pen body: Contains the medication reservoir
- Viewing window: Allows visual confirmation of medication
- Unlock button: Safety mechanism preventing accidental injection
- Injection button (purple): Triggers dose delivery
- Dose indicator: Displays the prescribed dose
Detailed Injection Procedure
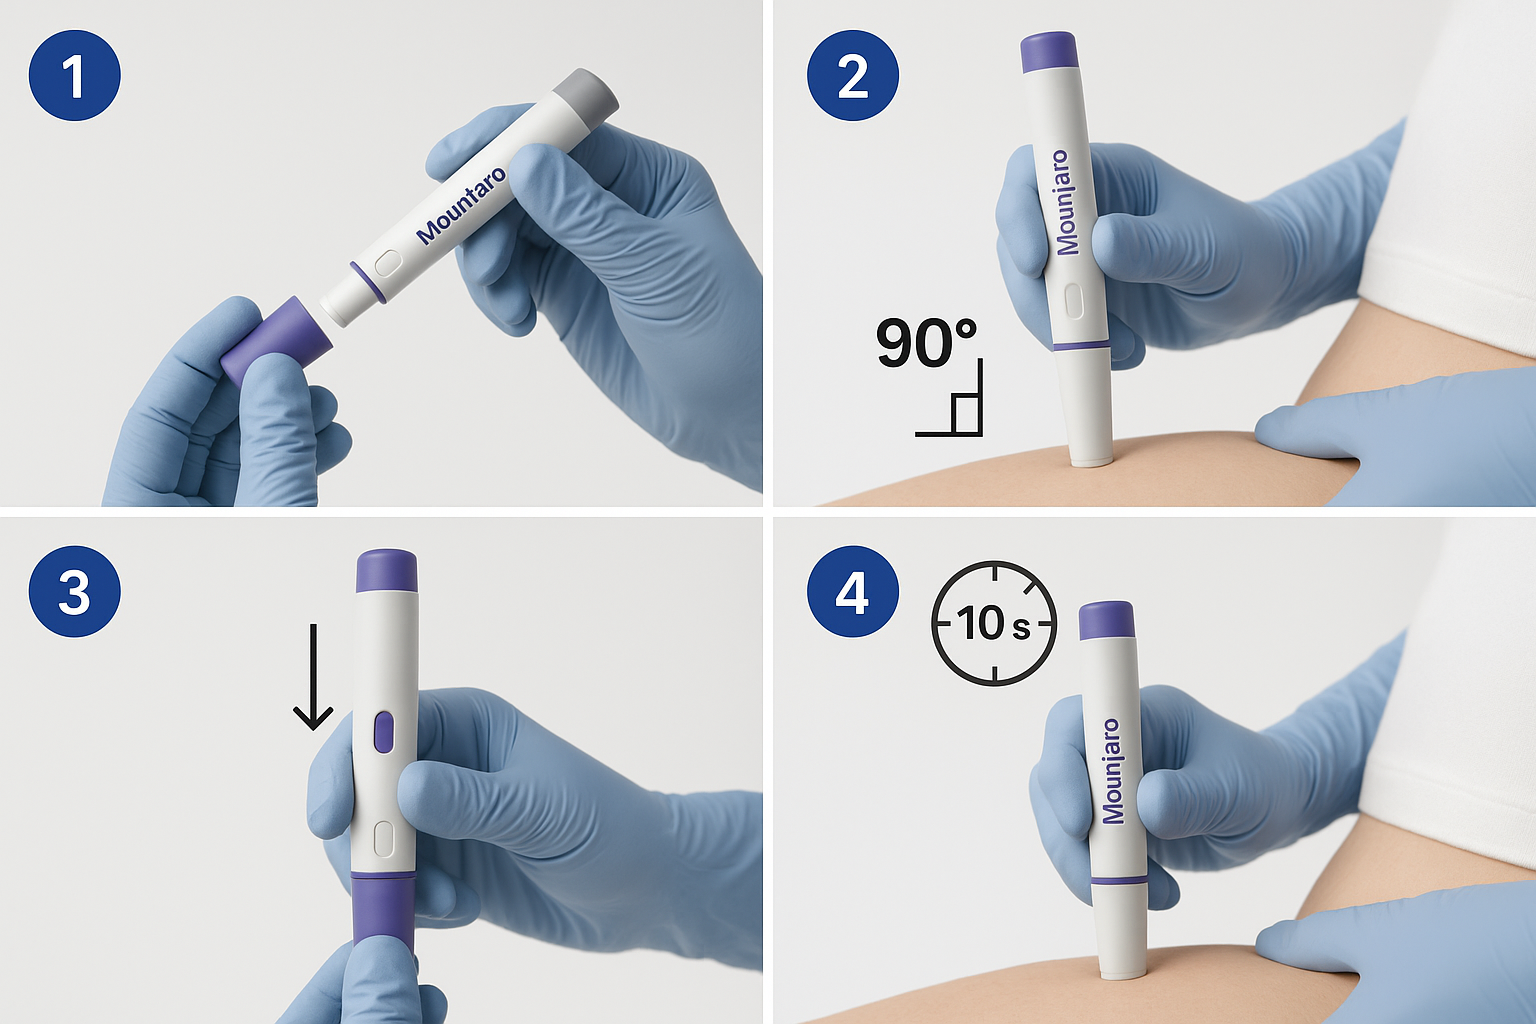
Step 1: Remove the Base Cap 🔓
Grasp the grey base cap firmly and pull straight off with a gentle twisting motion if needed. You’ll hear a soft click as it releases. Set the cap aside on your clean surface—you’ll need it for post-injection disposal.
Important: Never replace the base cap after removal, as this risks needle stick injury. The pen is designed for single use only.
Step 2: Inspect the Medication
Look through the viewing window to verify the solution appears clear and colourless to slightly yellow, without particles or cloudiness. If the medication appears abnormal, do not use the pen.
Step 3: Position the Pen
Hold the pen with your thumb on the injection button and your fingers around the pen body. Position the flat base (where the cap was removed) firmly against your prepared injection site at a 90-degree angle (perpendicular to the skin).
The 90-degree angle ensures the needle penetrates the subcutaneous tissue layer rather than remaining too superficial (which causes leakage) or going too deep (which may reach muscle).
Step 4: Unlock the Pen 🔐
While maintaining firm contact with the skin, press and hold the unlock button. You’ll feel the pen settle slightly as the needle penetrates the skin. This action is typically painless when performed decisively.
Step 5: Initiate Injection
Press the purple injection button fully. You’ll hear and feel the first click, indicating injection has started. Keep the pen pressed firmly against your skin.
Step 6: Complete Dose Delivery ⏱️
Critical: Continue holding the injection button and keeping the pen against your skin for at least 10 full seconds. Count slowly: “one-one-thousand, two-one-thousand…” through to ten.
You’ll hear a second click during this time, signalling injection completion. However, the second click doesn’t mean you can immediately remove the pen—continue the full 10-second count to ensure complete dose delivery.
Why 10 seconds matters: The pen mechanism requires this duration to deliver the full dose volume. Premature removal results in partial dosing, compromising therapeutic outcomes.
Step 7: Remove the Pen
After the full 10-second count, release the injection button and lift the pen straight away from your skin. The needle automatically retracts into the pen body for safety.
Step 8: Confirm Dose Delivery
Check the dose indicator window—it should show “0” if the full dose was delivered. A grey plunger should be visible in the viewing window.
Step 9: Post-Injection Care
- Apply gentle pressure with a cotton ball or gauze if needed (don’t rub)
- Apply an adhesive bandage if there’s minor bleeding
- Dispose of the entire pen in an approved sharps container immediately
Troubleshooting Common Pen Issues
| Issue | Cause | Solution |
|---|---|---|
| Pen doesn’t unlock | Not pressed firmly enough | Increase pressure against skin |
| No second click heard | Background noise, hearing difficulty | Rely on 10-second count instead |
| Medication leakage | Pen removed too quickly | Ensure full 10-second hold next time |
| Dose indicator doesn’t show “0” | Incomplete delivery | Contact healthcare provider; may need repeat dose |
| Painful injection | Too slow insertion, wrong angle | Use quick, decisive motion at 90° |
For researchers administering peptides in laboratory settings, similar principles apply to subcutaneous injections across various compounds available from PEPTIDE PRO. Consistent technique ensures reproducible experimental conditions and reliable data collection.
How to Inject Tirzepatide (Mounjaro) — Step‑by‑Step Using Vials and Syringes
While pre-filled pens offer convenience, some protocols require vial-and-syringe administration, particularly in research settings or when using compounded formulations. This method demands additional technical proficiency but provides greater dosing flexibility.
Selecting Appropriate Syringes
For tirzepatide vial administration, insulin syringes prove most suitable:
- Volume capacity: 0.5 mL or 1 mL syringes
- Needle gauge: 28-31 gauge (higher numbers = thinner needles)
- Needle length: 5/16 inch (8 mm) or 1/2 inch (12.7 mm) for subcutaneous injection
- Graduations: Ensure markings allow accurate measurement of your prescribed dose
Thinner needles (higher gauge numbers) reduce injection discomfort but require slightly more time for medication delivery. Most individuals find 30-gauge needles provide an optimal balance between comfort and practicality.
Vial Preparation and Dose Drawing
Step 1: Prepare the Vial
If using refrigerated medication, allow the vial to reach room temperature (30-60 minutes). Wipe the rubber stopper with an alcohol swab and allow to dry completely.
Step 2: Prepare the Syringe
Remove the syringe from its sterile packaging without touching the needle. Keep the needle cap in place until ready to draw medication.
Step 3: Draw Air
Pull the plunger back to draw air into the syringe equal to your prescribed dose volume. For example, if your dose is 0.5 mL (equivalent to 5 mg of a 10 mg/mL concentration), draw 0.5 mL of air.
Step 4: Inject Air into Vial
Remove the needle cap and insert the needle through the rubber stopper. Push the plunger to inject air into the vial. This equalises pressure, making medication withdrawal easier.
Step 5: Invert and Draw Medication
Keep the needle in the vial and turn the vial upside down. The needle tip should be submerged in the liquid. Slowly pull the plunger back to draw your prescribed dose into the syringe.
Step 6: Check for Air Bubbles
Hold the syringe with the needle pointing upward. Tap the syringe gently to move air bubbles to the top. Push the plunger slowly to expel air through the needle until a small drop of medication appears at the needle tip.
Step 7: Verify Dose
Check that the plunger aligns exactly with your prescribed dose marking. The measurement should be read at the top edge of the plunger’s rubber seal.
Injection Technique with Syringe
Step 1: Position and Pinch
With your non-dominant hand, gently pinch a fold of skin at your prepared injection site. This technique elevates the subcutaneous tissue away from underlying muscle, ensuring proper injection depth.
Use a gentle pinch—excessive pressure causes discomfort and may bruise. The skin fold should be approximately 1-2 inches wide.
Step 2: Insert the Needle
Hold the syringe like a dart with your dominant hand. In one smooth, quick motion, insert the needle at a 90-degree angle through the pinched skin. The entire needle should penetrate the skin.
For very lean individuals with minimal subcutaneous tissue: A 45-degree angle may be more appropriate to avoid intramuscular injection. Consult with a healthcare professional if uncertain.
Step 3: Release the Pinch (Optional)
Some protocols recommend releasing the skin pinch after needle insertion; others suggest maintaining it throughout injection. Both approaches are acceptable—use whichever feels more comfortable.
Step 4: Aspirate (Debated)
Traditional technique included pulling back slightly on the plunger to check for blood (indicating vein puncture). Current evidence suggests aspiration is unnecessary for subcutaneous injections in recommended sites, though some practitioners still prefer this safety check[4].
Step 5: Inject the Medication
Push the plunger down slowly and steadily at a rate of approximately 1 second per 0.1 mL. Rapid injection increases discomfort and may cause medication leakage.
Step 6: Count and Hold
After the plunger reaches the bottom, count slowly to 5-10 seconds before withdrawing the needle. This pause allows the medication to disperse into the tissue and prevents backflow through the needle track.
Step 7: Withdraw the Needle
Pull the needle straight out at the same angle it entered. Immediately activate the safety mechanism (if present) or carefully recap using the one-handed scoop method.
Step 8: Post-Injection Care
Apply gentle pressure with a cotton ball or gauze if needed. Dispose of the syringe in an approved sharps container immediately—never recap using two hands, as this creates needlestick risk.
Calculating Doses from Concentration
Understanding concentration calculations ensures accurate dosing when working with vials:
Formula: Volume (mL) = Desired Dose (mg) ÷ Concentration (mg/mL)
Example: If you need 5 mg and your vial concentration is 10 mg/mL:
- Volume = 5 mg ÷ 10 mg/mL = 0.5 mL
Always verify calculations and have a colleague double-check when working in research settings. For laboratories sourcing research peptides from PEPTIDE PRO, maintaining detailed dosing logs and calculation records ensures experimental reproducibility and regulatory compliance.
Timing, Scheduling, and Dose Adjustments
Successful tirzepatide therapy extends beyond proper injection technique to encompass consistent scheduling and appropriate dose titration. Understanding these temporal aspects optimises therapeutic outcomes whilst minimising adverse effects.
Weekly Injection Scheduling
Flexible Timing ⏰
Tirzepatide can be administered at any time of day, with or without meals. This flexibility accommodates diverse schedules and lifestyles, improving adherence. However, consistency enhances routine establishment and reduces missed doses.
Choosing Your Injection Day
Select a day of the week that aligns with your schedule:
- Weekend days: More time for preparation and recovery if side effects occur
- Weekdays: Integrates into established routines; healthcare provider access if questions arise
- Mid-week: Balances weekend and weekday considerations
Once established, maintain the same day each week. Consistency maintains stable blood levels and predictable therapeutic effects.
Managing Missed Doses
If you miss your scheduled injection:
Within 4 days (96 hours): Administer the missed dose as soon as you remember, then resume your regular weekly schedule.
More than 4 days late: Skip the missed dose entirely and administer your next dose on the regularly scheduled day. Never double dose to compensate for a missed injection.
Preventing missed doses:
- 📱 Set smartphone reminders or alarms
- 📅 Use calendar notifications
- 💊 Link injection to weekly routine (e.g., “Sunday mornings after breakfast”)
- 👥 Enlist family member or friend as reminder backup
Dose Escalation Protocol
The standard tirzepatide titration schedule balances efficacy with tolerability:
| Timeline | Dose | Purpose |
|---|---|---|
| Weeks 1-4 | 2.5 mg | Initial tolerance, GI adaptation |
| Weeks 5-8 | 5 mg | First therapeutic increase |
| Weeks 9-12 | 7.5 mg | Optional escalation if needed |
| Weeks 13-16 | 10 mg | Further titration for glycaemic control |
| Weeks 17-20 | 12.5 mg | Approaching maximum dose |
| Week 21+ | 15 mg | Maximum recommended dose |
Important considerations:
- Remain at each dose level for at least 4 weeks before escalating
- Dose increases should be based on glycaemic response, weight loss progress, and tolerability
- Not all individuals require maximum dosing—many achieve goals at 5-10 mg
- Never self-adjust doses without healthcare provider consultation
Managing Side Effects During Titration
Gastrointestinal effects (nausea, vomiting, diarrhoea) represent the most common tirzepatide side effects, typically occurring during dose escalation[5].
Mitigation strategies:
🍽
️ Eat smaller, more frequent meals
- 🚫 Avoid high-fat, greasy, or spicy foods
- 💧 Maintain adequate hydration
- ⏱️ Allow more time at current dose before escalating
- 💊 Discuss anti-nausea medications with healthcare provider if severe
Most gastrointestinal effects diminish within 2-4 weeks as the body adapts. If symptoms persist or worsen, consult your healthcare provider about temporarily reducing the dose or extending the time between increases.
“The tortoise wins the race in peptide therapy. Gradual titration with adequate adaptation time at each dose level produces superior long-term outcomes compared to aggressive escalation.” — Endocrinology Best Practices, 2025
Safety Considerations and Contraindications
Understanding safety parameters and recognising contraindications prevents adverse outcomes and ensures appropriate tirzepatide use. Both clinical and research applications demand rigorous attention to these factors.
Absolute Contraindications
Do not use tirzepatide if you have:
- Personal or family history of medullary thyroid carcinoma (MTC): Tirzepatide carries a boxed warning regarding thyroid C-cell tumours observed in rodent studies
- Multiple Endocrine Neoplasia syndrome type 2 (MEN 2): Genetic condition increasing MTC risk
- Previous serious hypersensitivity to tirzepatide: Including anaphylaxis or angioedema
- Pregnancy: Tirzepatide may cause foetal harm; discontinue at least 2 months before planned conception
Relative Contraindications and Precautions
Use with caution and medical supervision if you have:
- History of pancreatitis: GLP-1 receptor agonists have been associated with acute pancreatitis
- Severe gastrointestinal disease: Including gastroparesis, inflammatory bowel disease
- Diabetic retinopathy: Rapid glucose improvement may temporarily worsen retinopathy
- Renal impairment: Dehydration from GI side effects can worsen kidney function
- Gallbladder disease: Weight loss increases gallstone formation risk
Recognising Serious Adverse Reactions
Seek immediate medical attention if you experience:
🚨 Severe abdominal pain (potentially indicating pancreatitis)
- Persistent pain in upper abdomen radiating to back
- Accompanied by nausea and vomiting
- Does not resolve with over-the-counter remedies
🚨 Allergic reactions
- Difficulty breathing or swallowing
- Severe rash, hives, or itching
- Swelling of face, lips, tongue, or throat
- Rapid heartbeat or dizziness
🚨 Hypoglycaemia (when combined with insulin or sulfonylureas)
- Severe shakiness, sweating, confusion
- Rapid heartbeat, irritability
- Blurred vision, difficulty concentrating
🚨 Kidney problems
- Decreased urination
- Swelling in legs, ankles, or feet
- Unusual fatigue or confusion
🚨 Vision changes
- Sudden vision loss or blurriness
- Floaters or dark spots in vision
- Eye pain or pressure
Drug Interactions
Tirzepatide may interact with:
- Insulin and insulin secretagogues: Increased hypoglycaemia risk; dose reductions often necessary
- Oral medications: Delayed gastric emptying may affect absorption timing
- Warfarin: Monitor INR more frequently during initiation and dose changes
Storage and Handling Safety
Proper storage prevents medication degradation:
- 🧊 Refrigeration: Store unopened pens at 36-46°F (2-8°C)
- ❄️ Never freeze: Freezing destroys tirzepatide; discard frozen medication
🌡
️ Room temperature: Once in use, pens may be stored at room temperature (up to 86°F/30°C) for up to 21 days
- ☀️ Light protection: Keep in original carton until use to protect from light
- 👶 Child safety: Store out of reach of children and pets
Sharps Disposal Protocols
Proper needle disposal protects household members and waste handlers:
- Use FDA-cleared sharps containers: Purpose-designed puncture-resistant containers
- Never use household containers: Glass jars, plastic bottles, or regular trash bins are unsafe
- Dispose when 3/4 full: Don’t overfill containers
- Follow local regulations: Check municipal guidelines for sharps disposal options
- Consider mail-back programs: Many pharmacies and medical supply companies offer prepaid sharps disposal services
For research laboratories working with peptides from PEPTIDE PRO, institutional biosafety protocols and sharps disposal procedures must align with regulatory requirements and best practices for laboratory safety.
Optimising Injection Comfort and Minimising Side Effects
While proper technique ensures safety and efficacy, additional strategies can significantly enhance comfort and reduce common injection-related concerns.
Pain Reduction Techniques
Before injection:
- ❄️ Ice application: Apply ice wrapped in cloth for 30-60 seconds before injection to numb the area
- 🧘 Relaxation: Tense muscles increase pain; practice deep breathing and muscle relaxation
�
� Site selection: Abdomen typically less sensitive than thigh; experiment to find your least sensitive areas
🌡
️ Temperature: Ensure medication reaches room temperature (cold injections sting more)
During injection:
- ⚡ Quick insertion: Decisive, rapid needle insertion hurts less than slow, hesitant penetration
- 🐌 Slow medication delivery: Push plunger slowly and steadily (fast injection increases pressure and discomfort)
- 🧘 Distraction: Watch television, listen to music, or engage in conversation during injection
- 😮 Cough technique: Coughing during needle insertion provides neurological distraction
After injection:
- 🚫 Don’t rub: Gentle pressure is fine, but rubbing increases irritation and may affect absorption
- ❄️ Ice if needed: Brief ice application can reduce post-injection stinging
- 💊 Over-the-counter pain relief: Acetaminophen (paracetamol) for persistent injection site discomfort
Preventing Bruising and Bleeding
Bruising occurs when needle penetrates small blood vessels:
- 💊 Medication review: Aspirin, NSAIDs, and anticoagulants increase bruising risk
�
� Site inspection: Avoid areas with visible veins or previous bruising
- 📐 Proper angle: 90-degree insertion minimises tissue trauma
- ⏱️ Adequate hold time: Removing needle too quickly increases bleeding risk
- 🩹 Pressure application: Gentle pressure for 30-60 seconds after injection helps prevent bruising
If bruising occurs: It’s generally harmless and resolves within 7-14 days. Rotate to different sites while the bruise heals.
Managing Injection Site Reactions
Mild redness, swelling, or itching at injection sites affects approximately 2-3% of users[6]:
Normal reactions (resolve within 24-48 hours):
- Slight redness (less than 1 inch diameter)
- Minimal swelling or firmness
- Mild itching or warmth
Management:
- ❄️ Cold compress for 10-15 minutes
- 🚫 Avoid scratching or rubbing
- 💊 Antihistamine cream if itching persists
- 🔄 Rotate to different site for next injection
Concerning reactions (contact healthcare provider):
- Redness spreading beyond 2 inches
- Increasing warmth, pain, or swelling
- Pus or drainage
- Red streaks extending from injection site
- Fever or chills
Addressing Needle Anxiety
Trypanophobia (fear of needles) affects an estimated 20-30% of adults:
Cognitive strategies:
- 🧠 Reframing: Focus on health benefits rather than momentary discomfort
- 📚 Education: Understanding the process reduces fear of the unknown
�
� Gradual exposure: Practice with injection simulation before actual administration
🗣
️ Positive self-talk: Replace “This will hurt” with “I can handle brief discomfort”
Physical techniques:
- 🧘 Deep breathing: 4-7-8 breathing pattern (inhale 4 counts, hold 7, exhale 8)
- 💪 Applied tension: Tense leg and arm muscles during injection to prevent vasovagal response
- 👀 Visual distraction: Look away during needle insertion
- 🎵 Sensory distraction: Music, aromatherapy, or tactile objects
Professional support:
- Consider cognitive-behavioural therapy for severe needle phobia
- Discuss anxiolytic medication options with healthcare provider for extreme cases
- Request assistance from family member or friend during initial injections
Monitoring and Tracking Your Progress
Systematic monitoring and documentation optimise tirzepatide therapy outcomes and facilitate productive healthcare provider communication.
Essential Tracking Parameters
Injection log should include:
| Date | Dose | Site | Time | Side Effects | Notes |
|---|---|---|---|---|---|
| 15/01/25 | 2.5 mg | Abdomen (LUQ) | 9:00 AM | Mild nausea 2-3 hours post | First dose |
| 22/01/25 | 2.5 mg | Abdomen (RUQ) | 9:15 AM | None | Feeling good |
| 29/01/25 | 2.5 mg | Left thigh | 8:45 AM | Slight injection site redness | Resolved in 24h |
Additional monitoring metrics:
📊 Glycaemic control (for diabetes management):
- Fasting blood glucose (daily or as directed)
- Post-prandial glucose readings
- HbA1c (every 3 months)
- Time in range (if using continuous glucose monitor)
⚖️ Weight and body composition:
- Weekly weight measurements (same day, same time, same conditions)
- Monthly body measurements (waist, hips, etc.)
- Progress photographs (optional but motivating)
🩺 Vital signs:
- Blood pressure (especially if hypertensive)
- Resting heart rate
- Energy levels and exercise tolerance
💊 Medication adjustments:
- Changes to other diabetes medications
- Dose reductions due to improved glycaemic control
- New medications started or discontinued
🤢 Side effect tracking:
- Type, severity, duration of adverse effects
- Relationship to dose changes
- Interventions that helped
Using Technology for Tracking
Digital tools enhance adherence and monitoring:
- 📱 Smartphone apps: Diabetes management apps (MySugr, Glucose Buddy, etc.) track multiple parameters
- 📊 Spreadsheets: Customisable tracking in Google Sheets or Excel
🖥
️ Patient portals: Many healthcare systems offer integrated tracking tools
- ⌚ Wearable devices: Continuous glucose monitors, fitness trackers for activity and weight
When to Contact Your Healthcare Provider
Routine follow-up typically occurs:
- 4 weeks after initiation
- Before each dose escalation
- Every 3 months once stable
- As needed for concerns
Contact provider sooner if you experience:
- ⚠️ Severe or persistent side effects
- 📉 Hypoglycaemia episodes (especially if recurrent)
- 🤔 Questions about dose adjustments
- 💊 Changes to other medications
- 🤰 Pregnancy or pregnancy planning
- 🏥 Hospitalisation or emergency department visit
- 🔬 Abnormal laboratory results
For research applications, maintaining detailed logs and documentation ensures data integrity and facilitates analysis. Laboratories sourcing peptides from PEPTIDE PRO should implement standardised documentation protocols aligned with Good Laboratory Practice (GLP) guidelines.
Special Populations and Considerations
Certain populations require modified approaches or additional precautions when administering tirzepatide.
Paediatric Considerations
Current status: Tirzepatide is not approved for individuals under 18 years of age. Clinical trials in paediatric populations are ongoing. Use in children should only occur within approved research protocols with appropriate ethical oversight.
Geriatric Considerations
Older adults (65+ years) can safely use tirzepatide with attention to:
- 💧 Hydration status: Older adults have reduced thirst perception; emphasise fluid intake during GI side effects
- 💊 Polypharmacy: Increased drug interaction risk; comprehensive medication review essential
- 🧠 Cognitive function: May need caregiver assistance with injection technique
- 🦴 Skin changes: Thinner skin may bruise more easily; gentle technique important
- 🩺 Comorbidities: Higher prevalence of kidney disease, cardiovascular conditions requiring monitoring
Pregnancy and Lactation
Pregnancy: Tirzepatide is contraindicated during pregnancy. Animal studies demonstrated foetal harm. Discontinue at least 2 months before planned conception due to long half-life.
Lactation: Unknown whether tirzepatide transfers into human breast milk. Risk-benefit analysis required; many experts recommend avoiding use during breastfeeding.
Reproductive-age individuals: Use effective contraception during treatment and for 2 months after final dose.
Renal Impairment
Mild to moderate kidney disease: No dose adjustment required, but monitor carefully for dehydration from GI side effects, which can worsen renal function.
Severe renal impairment or end-stage renal disease: Limited data available; use with caution and close monitoring. Ensure adequate hydration and consider more gradual dose titration.
Hepatic Impairment
Liver disease: No dose adjustment required based on current evidence. However, individuals with severe hepatic impairment should be monitored closely, as clinical experience is limited.
Research Applications
For research purposes, tirzepatide and similar peptides require:
- ✅ Institutional Review Board (IRB) or ethics committee approval
- ✅ Informed consent from participants
- ✅ Standardised administration protocols
- ✅ Comprehensive safety monitoring
- ✅ Data collection and adverse event reporting systems
- ✅ Compliance with Good Clinical Practice (GCP) guidelines
Researchers sourcing peptides should partner with reputable suppliers like PEPTIDE PRO that provide certificates of analysis, proper documentation, and clearly labelled research-grade materials.
Frequently Asked Questions About Tirzepatide Injection
Can I inject tirzepatide in the same spot each week?
No, site rotation is essential. Repeatedly injecting the same location causes lipodystrophy (abnormal fat distribution), which impairs absorption and reduces efficacy. Rotate between different areas within the approved injection sites, maintaining at least 1 inch spacing from previous injection locations.
What if I see blood after removing the needle?
Small amounts of blood are normal and not concerning. Apply gentle pressure with cotton or gauze for 30-60 seconds. If bleeding continues beyond 2-3 minutes or is excessive, apply firm pressure and contact your healthcare provider if it doesn’t stop.
Can I inject through clothing?
No, never inject through clothing. Clothing carries bacteria that can be introduced into the injection site, increasing infection risk. Always inject into clean, bare skin that has been properly cleansed with alcohol.
What if I forget to hold the pen for 10 seconds?
If you removed the pen too quickly, you may not have received the full dose. Check the dose indicator—if it doesn’t show “0,” some medication remained in the pen. Contact your healthcare provider for guidance. Don’t administer another injection without professional advice, as this could result in overdosing.
Can I reuse needles or syringes?
Absolutely not. Needles and syringes are single-use only. Reusing needles causes:
- Increased pain (needles become dull)
- Higher infection risk
- Needle breakage
- Medication contamination
- Inaccurate dosing
Always use a fresh, sterile needle for each injection.
Is it normal to feel medication under the skin?
A small, temporary lump or firmness immediately after injection is normal—this is the medication depot in the subcutaneous tissue. It should disperse within 30-60 minutes. If lumps persist or worsen over time, this may indicate lipohypertrophy from inadequate site rotation.
Can I split my weekly dose into smaller, more frequent injections?
No, tirzepatide is specifically formulated for once-weekly administration. The pharmacokinetics are designed around this schedule. Altering the frequency changes the medication’s effectiveness and safety profile. Always follow the prescribed dosing schedule.
What if the medication looks cloudy or discoloured?
Do not use medication that appears cloudy, discoloured, or contains particles. Tirzepatide should be clear and colourless to slightly yellow. Abnormal appearance may indicate contamination, degradation, or freezing. Obtain a replacement pen or vial.
Can I travel with tirzepatide?
Yes, with proper planning:
- ✈️ Keep medication in original packaging with prescription label
- 🧊 Use insulated travel case with ice packs (don’t allow direct ice contact)
- 📋 Carry letter from healthcare provider explaining medical necessity
🌡
️ Never check medication in luggage (cargo holds may freeze)
🗺
️ Research destination’s importation regulations for injectable medications
How long does tirzepatide take to work?
Glucose lowering: Begins within hours, with maximum effects on fasting glucose within 1-2 weeks.
Weight loss: Typically becomes noticeable within 4-8 weeks, with continued loss over 6-12 months.
HbA1c reduction: Significant improvements typically seen at 3-month follow-up.
Individual responses vary based on starting parameters, dose, lifestyle factors, and concurrent medications.
Conclusion: Mastering Tirzepatide Injection Technique
Understanding how to inject Tirzepatide (Mounjaro) — step‑by‑step empowers individuals to confidently self-administer this innovative therapy whilst minimising complications and optimising outcomes. From proper site selection and preparation through precise pen operation or syringe technique, each element contributes to treatment success.
Key principles for successful tirzepatide administration:
✅ Preparation: Gather supplies, inspect medication, and create a clean workspace
✅ Site selection: Rotate between abdomen, thigh, and upper arm, avoiding damaged skin
✅ Proper technique: 90-degree angle, 10-second hold, complete dose delivery
✅ Consistent scheduling: Same day each week, appropriate dose titration
✅ Safety awareness: Recognise contraindications, monitor for adverse effects
✅ Systematic tracking: Document injections, side effects, and therapeutic response
The transition from initial apprehension to confident self-administration typically occurs within 2-4 weeks as technique becomes routine. Remember that temporary discomfort or mild side effects during the initiation phase are normal and generally resolve with continued use and proper management.
For healthcare professionals, researchers, and laboratories requiring high-purity peptides for research applications, partnering with reputable suppliers ensures quality and consistency. PEPTIDE PRO provides research-grade peptides with comprehensive documentation, rapid UK delivery, and professional support for the scientific community.
Next Steps
If you’re beginning tirzepatide therapy:
- Review this guide thoroughly before your first injection
- Practice with a demonstration device if available
- Consider having a healthcare professional observe your first self-injection
- Establish your injection day and set up tracking systems
- Schedule appropriate follow-up appointments
If you’re already using tirzepatide:
- Assess your current technique against best practices outlined here
- Optimise site rotation strategy
- Implement comfort-enhancing techniques
- Review your tracking and monitoring approach
- Prepare questions for your next healthcare provider visit
For research applications:
- Ensure appropriate ethical approvals and protocols
- Establish standardised administration procedures
- Implement comprehensive safety monitoring
- Source high-quality research peptides from verified suppliers
- Maintain detailed documentation aligned with regulatory requirements
Mastering injection technique represents just one component of comprehensive diabetes or weight management. Combined with appropriate nutrition, physical activity, stress management, and regular medical monitoring, tirzepatide can be a powerful tool in achieving your health goals.
The journey toward better health begins with a single injection—administered correctly, confidently, and consistently.
References
[1] Frias JP, et al. Tirzepatide versus Semaglutide Once Weekly in Patients with Type 2 Diabetes. N Engl J Med. 2021;385(6):503-515.
[2] Rosenstock J, et al. Efficacy and safety of a novel dual GIP and GLP-1 receptor agonist tirzepatide in patients with type 2 diabetes (SURPASS-1): a double-blind, randomised, phase 3 trial. Lancet. 2021;398(10295):143-155.
[3] Gentile S, et al. Lipohypertrophy in insulin-treated subjects and other injection-site skin reactions: are we sure everything is clear? Diabetes Ther. 2019;10(2):401-409.
[4] Sisson H. Aspirating during the intramuscular injection procedure: a systematic literature review. J Clin Nurs. 2015;24(17-18):2368-2375.
[5] Ludvik B, et al. Once-weekly tirzepatide versus once-daily insulin degludec as add-on to metformin with or without SGLT2 inhibitors in patients with type 2 diabetes (SURPASS-3): a randomised, open-label, parallel-group, phase 3 trial. Lancet. 2021;398(10300):583-598.
[6] Electronic Medicines Compendium. Mounjaro 2.5 mg solution for injection in pre-filled pen – Summary of Product Characteristics (SmPC). Accessed January 2025.